


KNX news
27 DE SEPTIEMBRE DE 2017
NEW WEINZIERL PRODUCTS

Weinzierl, the leading German software and hardware manufacturer for the building system technology based on KNX has launched two new products:
KNX POWER SUPPLY 640mA WITH USB INTERFACE
- The new 367 model is a 640 mA bus power supply with high efficiency and a small footprint of only 4 units (72 mm). The device has a bus choke, an integrated USB Interface (Micro USB connector) and additionally provides an output for auxiliary power.
The USB interface allows establishing a bidirectional connection between a PC and the KNX bus. The USB connector has a galvanic separation from the KNX bus. Both ETS (Version 4.2 or later) and visualization tools support this interface.
The KNX node monitors output current, bus voltage and the temperature in the enclosure. The configuration of the device is done with ETS. An easy to read OLED display on the front panel enables the user to display the operating parameters locally on the device.
Check the product HERE.
INTERFAZ KNXnet/IP (5 tunneling connections)
- The new KNX IP Interface 731 is the successor of the well-tried KNX IP Interface 730. The new compact design has a width of only 1 module (18 mm) and is powered by the KNX bus.
The device can be used as programming interface for ETS. You can access the KNX Bus from every point of your LAN. Furthermore, it allows you to program the KNX bus over the Internet. The IP address can be obtained by a DHCP server or by manual configuration (ETS) respectively. The buttons and LEDs on the device allow a local diagnosis including the operating status and communication errors.
Check the product HERE.
For further information, please do not hesitate to contact us via telephone +34.965.95.95.11, e-mail commercial@futurasmus-knxgroup.com o check the ONLINE CATALOG.

22 DE SEPTIEMBRE DE 2017
NEW RANGE OF MDT DIMMER ACTUATOR FOR LED STRIPS (WHITE & RGBW)
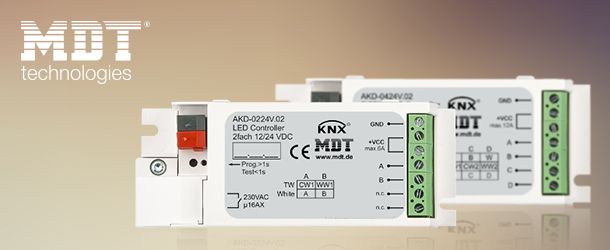
Discover all the functionality of the new range of MDT dimmer actuator for led strips, robust and quality products. That is why MDT is the only manufacturer that offers 3 years warranty.
The new range is suitable for white and RGBW led strips, now with tunable white colour temperature control.
- Production in Germany certified according to ISO 9001
- Extensive function extension
- Absolute and relative dimming for HSV color space and RGB
- Tunable White colour temperature control
- Selectable dimming curve and PWM frequency up to 1000Hz
- Global and individual dimming speeds
- Individual and predefined sequences (e.g. TV Simulator)
- Repetition of sequences for automatic colour control
- Suitable for 12/24V CV LED (Common Anode):
- 3A for each colour channel (flush mounted device)
- 4A for each colour channel (MDRC device)
- 3A for each colour channel (flush mounted device)
- Parallel operation of 2 channels
- Selectable load distribution:
- AKD-0424R.02: 4 channels with 4A or 3 ch. with 3A/1 ch. 7A
- AKD-0424V.02: 4 channels with 3A or 3 ch. with 2,25A/1 ch. 5,25A
- AKD-0324V.02: 3 channels with 3A or 2 ch. with 2,25A/1 ch. 4,5A
- AKD-0424R.02: 4 channels with 4A or 3 ch. with 3A/1 ch. 7A
- Operating modes:
- 4 x White, RGB, RGBW, Tunable White (AKD-0424x.02)
- Automatic colour temperature control Dim2Warm
- Dynamic daylight control HCL (Human Centric Lighting)
- Automatic time-dependent dimming
- Day/night function
- Overcurrent and overtemperature supervision
- Intelligent 16A C-Load Relay output to control external LED power supply
- 3 years warranty
The following list shows all the dimmers available:
| Web Code | Product |
| 18683 | Dimmer Actuador for White LED strips 12/24V, 2ch.
Flush mounted |
| 18684 | Dimmer Actuador for RGB LED strips 12/24V, 3ch.
Flush mounted |
| 18685 | Dimmer Actuador for RGBW LED strips 12/24V, 4ch.
Flush mounted |
| 18682 | Dimmer Actuador for RGBW LED strips 12/24V, 4ch.
DIN rail 4U |
For further information, please do not hesitate to contact us via telephone +34.965.95.95.11, e-mail commercial@futurasmus-knxgroup.com o accede a la GAMA completa de productos MDT.
16 DE ENERO DE 2017
Winner of the Lucky Draw Vote for the best Tip or Trick – 15th aniversary contest

On the occasion of Futurasmus 15th anniversary, We introduced a KNX Tips & Tricks contest with prizes over 15.000€ in KNX devices for the winners (1st prize, 2nd prize, 3rd prize).
After a great participation, We also want to be grateful for the implication of all those join voting, so We did a 1.500€ lucky draw in KNX devices, and the winner was Víctor Rábanos Martínez from ICM Ingeniería. Click on the LINK to see the Lucky Draw video.
19 DE DICIEMBRE DE 2016
Tips awards 15th anniversary- 1st price - Simulation of an alarm central system with Iddero

In this tutorial I will be explaining step by step how to simulate an alarm monitoring system in any of the IDDERO devices (HC1i-KNX, HC2-KNX, HC2-KNX and Iddero Home Server). This is a very simple example in which only 1 movement sensor is being used. Integrators may use it to understand the basic concept, that can later on be extended, improved and adapted to any specific project.
STEP 1: DEFINITION OF GROUP ADDRESSES
Group addresses created in the ETS: 7/0/0 -> Presence detector 7/0/1 -> Armed/Disarmed 7/0/2 -> Alarm
Internal group addresses created in Iddero-config int/1 -> Arm with delay int/2 -> Filter of "1" in Arm int/3 -> Detector with delay int/4 -> Filter of "1" in Presence detector
STEP 2: DEFINITION OF ZONES AND PAGES
- In Iddero-config, section "Zones and pages", we create a page called "Intrusion" from which we can control and monitor the status of our alarm.
- The page is composed by 4 buttons and it will be assigned an Access Level so that a password is required to open it.
- The first button will be configured as follows: • Name: Arm • Type: Universal Push Button • Data Type: Activation (DPT 1.x) • Visualization format: Icons (red lock both for ON and OFF) • Behaviour: Send only one value • Value when sending: 1 • Link communication object to 7/0/1 (Armed/Disarmed)
- The second button will be configured as follows: • Name: Disarm • Type: Universal Push Button • Data Type: Activation (DPT 1.x) • Visualization format: Icons (green lock both for ON and OFF) • Behaviour: Send only one value • Value when sending: 0 • Link communication object to 7/0/1 (Armed/Disarmed)
- The third button will be configured as follows: • Name: Status Armed / Disarmed • Type: Indicator • Data Type: Activation (DPT 1.x) • Visualization format: Icons (green lock for OFF and red lock for ON) • Link communication object to 7/0/1 (Armed/Disarmed)
- The fourth button will be configured as follows: • Name: Status Armed / Disarmed • Type: Indicator • Data Type: Activation (DPT 1.x) • Visualization format: Predefined texts (ON ->Presence; OFF ->No presence) • Link communication object to 7/0/0 (Armed/Disarmed)
STEP 3: LOGIC GATES
1- AND armed/sensor: The alarm is triggered if the system has not been disarmed before the entrance time elapses. To do so, 3 group addresses are compared: • Name: AND armed/sensor • Logic function: AND • Number of inputs: 3 • Transmit to the input with each event: checked • Filter function: ON and OFF telegrams • Enable blocking: unchecked • Link input object #1 to int/1 (Arm with delay) • Link input object #2 to int/3 (Detector with delay) • Link input object #3 to 7/0/1 (Armed/Disarmed) • Link output object to 7/0/2 (Alarm)
2- Filter Armed "1": When the alarm is armed, telegram "1" is filtered so as to start the timer that will define the "exit time". • Name: Filter Armed "1": • Logic function: ID • Number of inputs: 1 • Transmit to the input with each event: marked • Filter function: only ON telegrams • Enable blocking: unchecked • Link input object to 7/0/1 (Armed/Disarmed) • Link output object to int/2 (Filter of "1" in Armed)
3- Filter Detector with delay "1": When a person is detected by the movement detector when entering the house, the latter sends a "1" via the group address 7/0/0. The telegram "1" is filtered in order to start the timer that will define the "entrance time". • Name: Filter Detector with delay "1" • Logic function: ID • Number of inputs: 1 • Transmit to the input with each event: marked • Filter function: only ON telegrams • Enable blocking: unchecked • Link input object to 7/0/0 (Presence detector) • Link output object to int/4 (Filter of "1" in Presence detector)
4.- Filter Disarmed: When disarming the system via the display, the value "0" is sent to the internal group addresses int/1 and int/3 (Arm with delay and Detector with delay), thus leaving the alarm central ready for a new arming process. • Name: Filter Disarmed "0" • Logic function: ID • Number of inputs: 1 • Transmit to the input with each event: marked • Filter function: only OFF telegrams • Enable blocking: unchecked • Link input object to 7/0/1 (Armed/Disarmed) • Link output object to int/1 and int/3 (Armed with delay and Detector with delay)
STEP 4: TIMERS
1- Delay after arming: The exit time of the system is defined here. In our case, we will have 30 seconds to exit the building, during which the system ignores any movement detection by the detector. • Name: Delay after arming • Data type of the channel: Activation (DPT 1.x) • Propagation delay (base): 1 sec • Propagation delay (factor): 30 • Overlapping of events: Ignore pending events • Enable blocking: unchecked • Link input object to int/2 (Filter of "1" in Armed) • Link output object to int/1 (Arm with delay)
2- Detector delay: The entrance time of the system is defined here. In this example, we will have 30 seconds to disarm the system when accessing the building. If we do not proceed to disarm (which means, the intrusion is real), a "1" will be sent to the group address 7/0/2 (Alarm). • Name: Delay after arming • Data type of the channel: Activation (DPT 1.x) • Propagation delay (base): 1 sec • Propagation delay (factor): 30 • Overlapping of events: Ignore pending events • Enable blocking: unchecked • Link input object to int/4 (Filter of "1" in Presence detector) • Link output object to int/3 (Detector with delay)
STEP 5: ADD TECHNICAL ALARM IN "SAFETY"
Iddero devices have a section called "Safety". Here we can add our intrusion alarm. Thanks to this fact, when the alarm is activated, the display will issue an acoustic signal and an icon will show that an alarm has occurred. Also, a historical log will allow us to check the date and time of each alarm. This is how we can add a configured alarm: • Name: Intrusion alarm • Alarm text: Intrusion alarm • Acoustic signal: checked • Polarity of the alarm object: 1 • Manual recognition: checked • External recognition: 0 • Send value with recognition: Send 0 • Explicit deactivation of the alarm: checked • Reactivation after recognition: never • Link alarm object to 7/0/2 (Alarm) • Link Recognition Notification object to 7/0/1 (Armed/Disarmed) • Link External Recognition object to 7/0/1 (Armed/Disarmed)
STEP 6: E-MAIL NOTIFICATION
The Iddero Touch Displays also have a section called "E-Mail". Here we can define the sending of notifications via e-mail associated to the events occurred in the system. In our example, we will add a notification associated with our alarm as follows: • Name: Intrusion alarm • Data Type: Activation (DPT 1.x) • Notification condition: When the value of the communication object changes • E-mail subject: Intrusion alarm • E-Mail text: (leave blank)
When the alarm is activated, the user will receive an e-mail with the contennt "Intrusion Alarm ON"; when the alarm is deactivated, "Intrusion Alarm OFF".

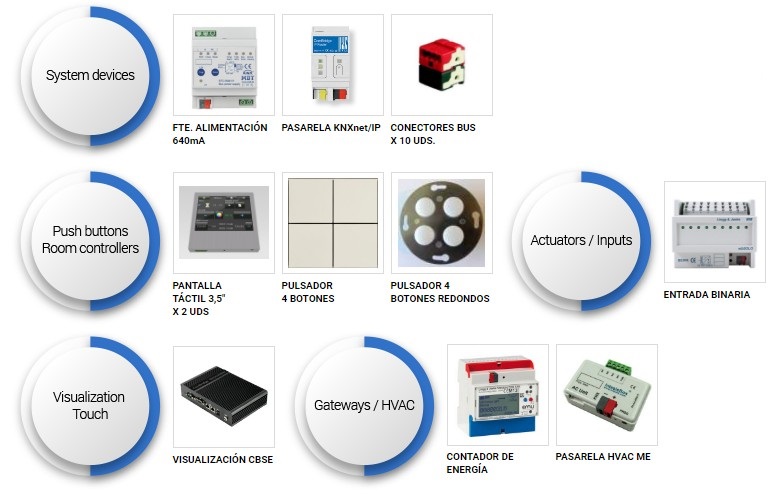
All the following KNX devices are included in the 1st price:
13 DE DICIEMBRE DE 2016
Tips awards 15th anniversary- 2nd price - Save time and avoid problems.

Whenever we finish the configuration of a device and the linking of group addresses, we must program the devices. This can become a tedious task and often we forget programming one device until we realize that the project is not working properly.
Here comes my contribution: once the you are done with the configuration of the devices and the linking of objects, in the same window of group addresses and right-clicking on the appropriate group address, a drop down menu will appear; here we can choose:Download - Full/Parcial download / Download application.
With this the configuration will be automatically sent to those devices contained in that group address, thus avoiding oversights or programming a device unnecessarily.
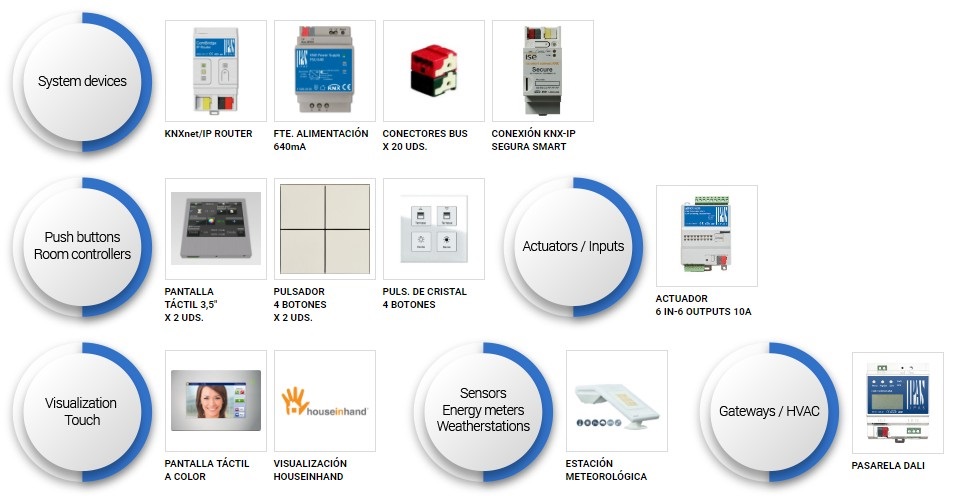
All the following KNX devices are included in the 2nd price