


KNX NEWS
19 DE DICIEMBRE DE 2016
Tips awards 15th anniversary- 1st price - Simulation of an alarm central system with Iddero

Our KNX Tips and Tricks Awards (by Futurasmus 15th Anniversary) has come to an end and below you can read the tip that has been awarded with the 1st Price (KNX devices worth 7.000 €). Congratulations!
In this tutorial I will be explaining step by step how to simulate an alarm monitoring system in any of the IDDERO devices (HC1i-KNX, HC2-KNX, HC2-KNX and Iddero Home Server). This is a very simple example in which only 1 movement sensor is being used. Integrators may use it to understand the basic concept, that can later on be extended, improved and adapted to any specific project.
STEP 1: DEFINITION OF GROUP ADDRESSES
Group addresses created in the ETS: 7/0/0 -> Presence detector 7/0/1 -> Armed/Disarmed 7/0/2 -> Alarm
Internal group addresses created in Iddero-config int/1 -> Arm with delay int/2 -> Filter of "1" in Arm int/3 -> Detector with delay int/4 -> Filter of "1" in Presence detector
STEP 2: DEFINITION OF ZONES AND PAGES
- In Iddero-config, section "Zones and pages", we create a page called "Intrusion" from which we can control and monitor the status of our alarm.
- The page is composed by 4 buttons and it will be assigned an Access Level so that a password is required to open it.
- The first button will be configured as follows: • Name: Arm • Type: Universal Push Button • Data Type: Activation (DPT 1.x) • Visualization format: Icons (red lock both for ON and OFF) • Behaviour: Send only one value • Value when sending: 1 • Link communication object to 7/0/1 (Armed/Disarmed)
- The second button will be configured as follows: • Name: Disarm • Type: Universal Push Button • Data Type: Activation (DPT 1.x) • Visualization format: Icons (green lock both for ON and OFF) • Behaviour: Send only one value • Value when sending: 0 • Link communication object to 7/0/1 (Armed/Disarmed)
- The third button will be configured as follows: • Name: Status Armed / Disarmed • Type: Indicator • Data Type: Activation (DPT 1.x) • Visualization format: Icons (green lock for OFF and red lock for ON) • Link communication object to 7/0/1 (Armed/Disarmed)
- The fourth button will be configured as follows: • Name: Status Armed / Disarmed • Type: Indicator • Data Type: Activation (DPT 1.x) • Visualization format: Predefined texts (ON ->Presence; OFF ->No presence) • Link communication object to 7/0/0 (Armed/Disarmed)
STEP 3: LOGIC GATES
1- AND armed/sensor: The alarm is triggered if the system has not been disarmed before the entrance time elapses. To do so, 3 group addresses are compared: • Name: AND armed/sensor • Logic function: AND • Number of inputs: 3 • Transmit to the input with each event: checked • Filter function: ON and OFF telegrams • Enable blocking: unchecked • Link input object #1 to int/1 (Arm with delay) • Link input object #2 to int/3 (Detector with delay) • Link input object #3 to 7/0/1 (Armed/Disarmed) • Link output object to 7/0/2 (Alarm)
2- Filter Armed "1": When the alarm is armed, telegram "1" is filtered so as to start the timer that will define the "exit time". • Name: Filter Armed "1": • Logic function: ID • Number of inputs: 1 • Transmit to the input with each event: marked • Filter function: only ON telegrams • Enable blocking: unchecked • Link input object to 7/0/1 (Armed/Disarmed) • Link output object to int/2 (Filter of "1" in Armed)
3- Filter Detector with delay "1": When a person is detected by the movement detector when entering the house, the latter sends a "1" via the group address 7/0/0. The telegram "1" is filtered in order to start the timer that will define the "entrance time". • Name: Filter Detector with delay "1" • Logic function: ID • Number of inputs: 1 • Transmit to the input with each event: marked • Filter function: only ON telegrams • Enable blocking: unchecked • Link input object to 7/0/0 (Presence detector) • Link output object to int/4 (Filter of "1" in Presence detector)
4.- Filter Disarmed: When disarming the system via the display, the value "0" is sent to the internal group addresses int/1 and int/3 (Arm with delay and Detector with delay), thus leaving the alarm central ready for a new arming process. • Name: Filter Disarmed "0" • Logic function: ID • Number of inputs: 1 • Transmit to the input with each event: marked • Filter function: only OFF telegrams • Enable blocking: unchecked • Link input object to 7/0/1 (Armed/Disarmed) • Link output object to int/1 and int/3 (Armed with delay and Detector with delay)
STEP 4: TIMERS
1- Delay after arming: The exit time of the system is defined here. In our case, we will have 30 seconds to exit the building, during which the system ignores any movement detection by the detector. • Name: Delay after arming • Data type of the channel: Activation (DPT 1.x) • Propagation delay (base): 1 sec • Propagation delay (factor): 30 • Overlapping of events: Ignore pending events • Enable blocking: unchecked • Link input object to int/2 (Filter of "1" in Armed) • Link output object to int/1 (Arm with delay)
2- Detector delay: The entrance time of the system is defined here. In this example, we will have 30 seconds to disarm the system when accessing the building. If we do not proceed to disarm (which means, the intrusion is real), a "1" will be sent to the group address 7/0/2 (Alarm). • Name: Delay after arming • Data type of the channel: Activation (DPT 1.x) • Propagation delay (base): 1 sec • Propagation delay (factor): 30 • Overlapping of events: Ignore pending events • Enable blocking: unchecked • Link input object to int/4 (Filter of "1" in Presence detector) • Link output object to int/3 (Detector with delay)
STEP 5: ADD TECHNICAL ALARM IN "SAFETY"
Iddero devices have a section called "Safety". Here we can add our intrusion alarm. Thanks to this fact, when the alarm is activated, the display will issue an acoustic signal and an icon will show that an alarm has occurred. Also, a historical log will allow us to check the date and time of each alarm. This is how we can add a configured alarm: • Name: Intrusion alarm • Alarm text: Intrusion alarm • Acoustic signal: checked • Polarity of the alarm object: 1 • Manual recognition: checked • External recognition: 0 • Send value with recognition: Send 0 • Explicit deactivation of the alarm: checked • Reactivation after recognition: never • Link alarm object to 7/0/2 (Alarm) • Link Recognition Notification object to 7/0/1 (Armed/Disarmed) • Link External Recognition object to 7/0/1 (Armed/Disarmed)
STEP 6: E-MAIL NOTIFICATION
The Iddero Touch Displays also have a section called "E-Mail". Here we can define the sending of notifications via e-mail associated to the events occurred in the system. In our example, we will add a notification associated with our alarm as follows: • Name: Intrusion alarm • Data Type: Activation (DPT 1.x) • Notification condition: When the value of the communication object changes • E-mail subject: Intrusion alarm • E-Mail text: (leave blank)
When the alarm is activated, the user will receive an e-mail with the contennt "Intrusion Alarm ON"; when the alarm is deactivated, "Intrusion Alarm OFF".

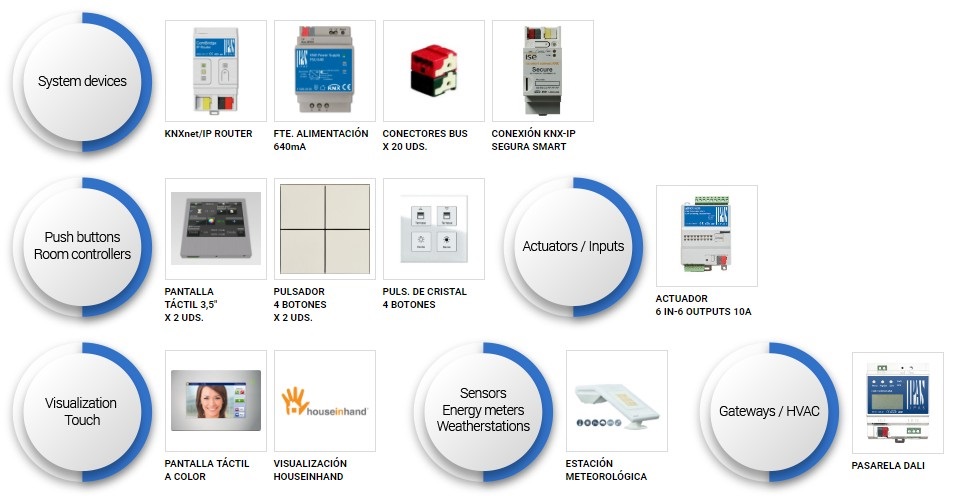
All the following KNX devices are included in the 1st price:
In this tutorial I will be explaining step by step how to simulate an alarm monitoring system in any of the IDDERO devices (HC1i-KNX, HC2-KNX, HC2-KNX and Iddero Home Server). This is a very simple example in which only 1 movement sensor is being used. Integrators may use it to understand the basic concept, that can later on be extended, improved and adapted to any specific project.
STEP 1: DEFINITION OF GROUP ADDRESSES
Group addresses created in the ETS: 7/0/0 -> Presence detector 7/0/1 -> Armed/Disarmed 7/0/2 -> Alarm
Internal group addresses created in Iddero-config int/1 -> Arm with delay int/2 -> Filter of "1" in Arm int/3 -> Detector with delay int/4 -> Filter of "1" in Presence detector
STEP 2: DEFINITION OF ZONES AND PAGES
- In Iddero-config, section "Zones and pages", we create a page called "Intrusion" from which we can control and monitor the status of our alarm.
- The page is composed by 4 buttons and it will be assigned an Access Level so that a password is required to open it.
- The first button will be configured as follows: • Name: Arm • Type: Universal Push Button • Data Type: Activation (DPT 1.x) • Visualization format: Icons (red lock both for ON and OFF) • Behaviour: Send only one value • Value when sending: 1 • Link communication object to 7/0/1 (Armed/Disarmed)
- The second button will be configured as follows: • Name: Disarm • Type: Universal Push Button • Data Type: Activation (DPT 1.x) • Visualization format: Icons (green lock both for ON and OFF) • Behaviour: Send only one value • Value when sending: 0 • Link communication object to 7/0/1 (Armed/Disarmed)
- The third button will be configured as follows: • Name: Status Armed / Disarmed • Type: Indicator • Data Type: Activation (DPT 1.x) • Visualization format: Icons (green lock for OFF and red lock for ON) • Link communication object to 7/0/1 (Armed/Disarmed)
- The fourth button will be configured as follows: • Name: Status Armed / Disarmed • Type: Indicator • Data Type: Activation (DPT 1.x) • Visualization format: Predefined texts (ON ->Presence; OFF ->No presence) • Link communication object to 7/0/0 (Armed/Disarmed)
STEP 3: LOGIC GATES
1- AND armed/sensor: The alarm is triggered if the system has not been disarmed before the entrance time elapses. To do so, 3 group addresses are compared: • Name: AND armed/sensor • Logic function: AND • Number of inputs: 3 • Transmit to the input with each event: checked • Filter function: ON and OFF telegrams • Enable blocking: unchecked • Link input object #1 to int/1 (Arm with delay) • Link input object #2 to int/3 (Detector with delay) • Link input object #3 to 7/0/1 (Armed/Disarmed) • Link output object to 7/0/2 (Alarm)
2- Filter Armed "1": When the alarm is armed, telegram "1" is filtered so as to start the timer that will define the "exit time". • Name: Filter Armed "1": • Logic function: ID • Number of inputs: 1 • Transmit to the input with each event: marked • Filter function: only ON telegrams • Enable blocking: unchecked • Link input object to 7/0/1 (Armed/Disarmed) • Link output object to int/2 (Filter of "1" in Armed)
3- Filter Detector with delay "1": When a person is detected by the movement detector when entering the house, the latter sends a "1" via the group address 7/0/0. The telegram "1" is filtered in order to start the timer that will define the "entrance time". • Name: Filter Detector with delay "1" • Logic function: ID • Number of inputs: 1 • Transmit to the input with each event: marked • Filter function: only ON telegrams • Enable blocking: unchecked • Link input object to 7/0/0 (Presence detector) • Link output object to int/4 (Filter of "1" in Presence detector)
4.- Filter Disarmed: When disarming the system via the display, the value "0" is sent to the internal group addresses int/1 and int/3 (Arm with delay and Detector with delay), thus leaving the alarm central ready for a new arming process. • Name: Filter Disarmed "0" • Logic function: ID • Number of inputs: 1 • Transmit to the input with each event: marked • Filter function: only OFF telegrams • Enable blocking: unchecked • Link input object to 7/0/1 (Armed/Disarmed) • Link output object to int/1 and int/3 (Armed with delay and Detector with delay)
STEP 4: TIMERS
1- Delay after arming: The exit time of the system is defined here. In our case, we will have 30 seconds to exit the building, during which the system ignores any movement detection by the detector. • Name: Delay after arming • Data type of the channel: Activation (DPT 1.x) • Propagation delay (base): 1 sec • Propagation delay (factor): 30 • Overlapping of events: Ignore pending events • Enable blocking: unchecked • Link input object to int/2 (Filter of "1" in Armed) • Link output object to int/1 (Arm with delay)
2- Detector delay: The entrance time of the system is defined here. In this example, we will have 30 seconds to disarm the system when accessing the building. If we do not proceed to disarm (which means, the intrusion is real), a "1" will be sent to the group address 7/0/2 (Alarm). • Name: Delay after arming • Data type of the channel: Activation (DPT 1.x) • Propagation delay (base): 1 sec • Propagation delay (factor): 30 • Overlapping of events: Ignore pending events • Enable blocking: unchecked • Link input object to int/4 (Filter of "1" in Presence detector) • Link output object to int/3 (Detector with delay)
STEP 5: ADD TECHNICAL ALARM IN "SAFETY"
Iddero devices have a section called "Safety". Here we can add our intrusion alarm. Thanks to this fact, when the alarm is activated, the display will issue an acoustic signal and an icon will show that an alarm has occurred. Also, a historical log will allow us to check the date and time of each alarm. This is how we can add a configured alarm: • Name: Intrusion alarm • Alarm text: Intrusion alarm • Acoustic signal: checked • Polarity of the alarm object: 1 • Manual recognition: checked • External recognition: 0 • Send value with recognition: Send 0 • Explicit deactivation of the alarm: checked • Reactivation after recognition: never • Link alarm object to 7/0/2 (Alarm) • Link Recognition Notification object to 7/0/1 (Armed/Disarmed) • Link External Recognition object to 7/0/1 (Armed/Disarmed)
STEP 6: E-MAIL NOTIFICATION
The Iddero Touch Displays also have a section called "E-Mail". Here we can define the sending of notifications via e-mail associated to the events occurred in the system. In our example, we will add a notification associated with our alarm as follows: • Name: Intrusion alarm • Data Type: Activation (DPT 1.x) • Notification condition: When the value of the communication object changes • E-mail subject: Intrusion alarm • E-Mail text: (leave blank)
When the alarm is activated, the user will receive an e-mail with the contennt "Intrusion Alarm ON"; when the alarm is deactivated, "Intrusion Alarm OFF".
All the following KNX devices are included in the 1st price: