


KNX news
14 DE OCTUBRE DE 2021
NEW ENERTEX® RGB+CCT LED DIMMER (20A / 5 channels)) Finally a simple way to manage RGB and color temperature!
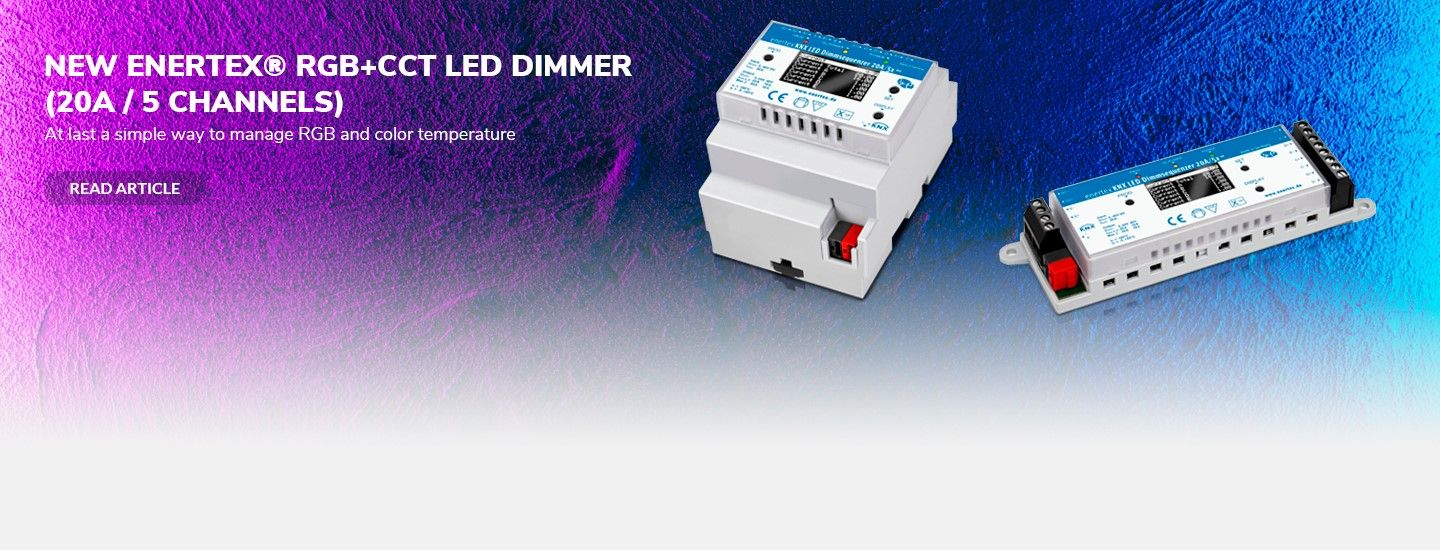
The German manufacturer Enertex presents its unique dimmer for LED strips KNX LED Dimmsequenzer 20A/5x with unique features on the market.
This novelty is a great advantage! Now, with LED strips that include RGB+CCT (Correlated Color Temperature) technology we have the opportunity to combine the RGB part with the cool white and warm white control part, automatically generating softer colors and a wider white range, among many other functions.
Until now, for RGBW lighting, a dedicated RGB color adjustment component independent of the color temperature or white component was required, where the adjustment had to be performed on each of them individually, i.e. in 2 steps. Now, the RGB+CCT technology allows to manage colors and white light in an improved way compared to the usual way.
Enertex has been the first to introduce this mode to the market in the current generation of KNX devices and calls it "RGB extended" and "TW extended".
For the examples described below, RGB+CCT LED strips are considered, which have 3 emitting diodes: One diode with 3 colors for RGB and another 2 white light diodes to achieve dimming within the range of approximately 2,700K to 6,000K.
EXAMPLE OF "EXTENDED RGB":
- Requirement: To achieve a Smoothed Blue tone, taking into account the white tones:
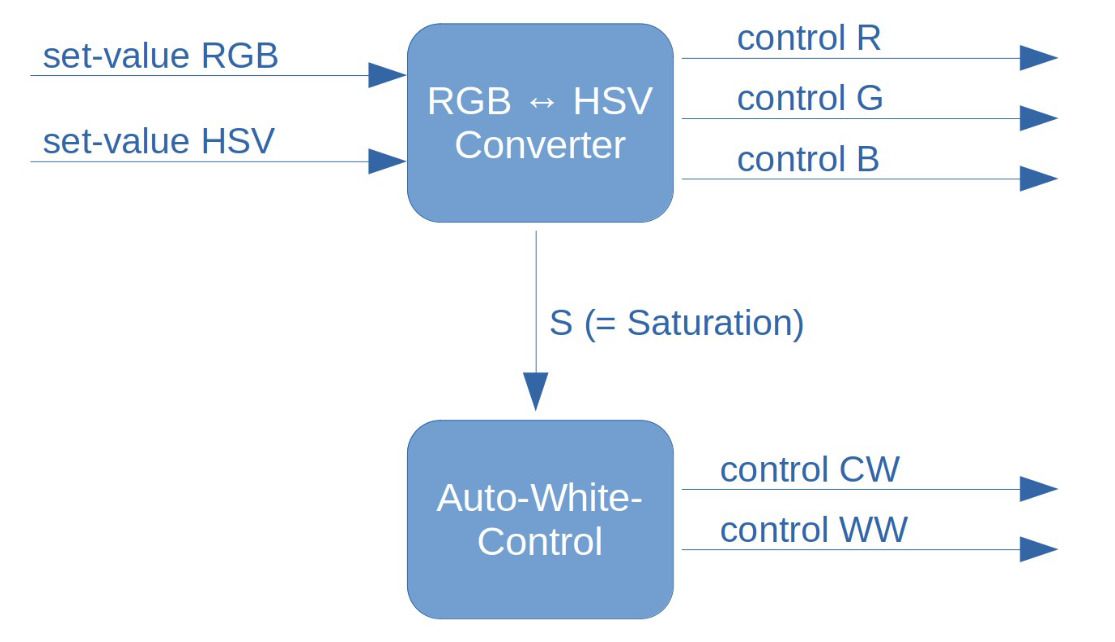
- Normal solution: In normal RGB application or when automatic blending is disabled, to achieve this effect, you have to reduce the saturation, i.e. it is achieved by setting the Blue color to 100% and blending the R and G channels by 50% each.
- Solution with Enertex: Allows the two white channels to be mixed automatically when the saturation of a color value is lowered. This results in a "nicer" white tone than the white tone mixed by the RGBW colors, achieving softer colors, avoiding adjusting the saturation.
The calculation of the color values and the mixing of the white channel is done internally in the device and does not have to be parameterized by the user. Only the desired color temperature of the white LEDs has to be specified.
EXAMPLE OF "EXTENDED TW":
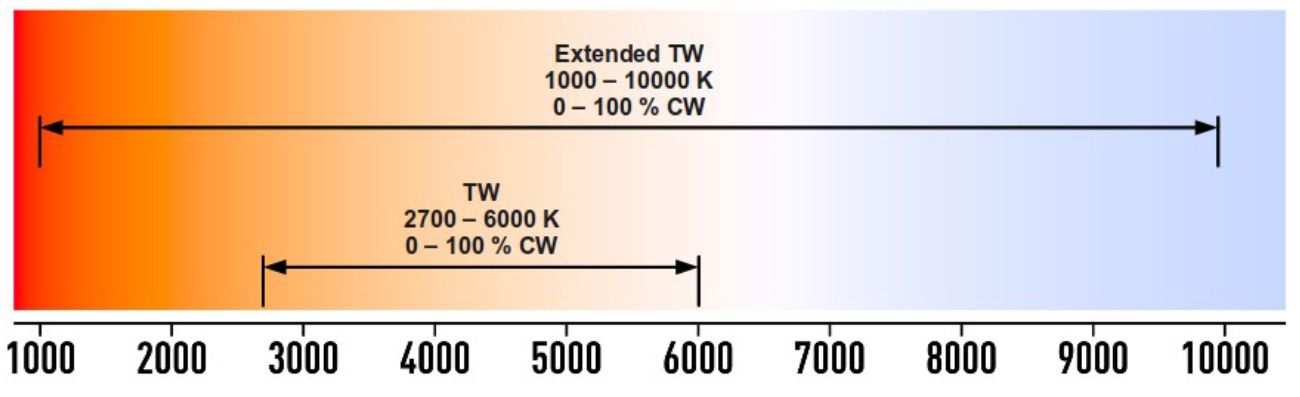
- Requirement: Extend the white range at the lower and upper end of those allowed by the LED strip whites (2,700K to 6,000K):
- Solution with Enertex: The "Extended-TW" application makes it possible to extend the color temperature range of the adjustable white channel by automatically mixing the R, G and B color channels in the same channel, in addition to the temperature values of the two white channels. The user does not have to perform any complex calculations or tests with each individual luminaire. Only the light temperature of the white LEDs has to be specified. The Enertex algorithm automatically determines the optimum control.
Parameterization:
- Warm white color temperature: 2,700 K
- Cool white color temperature: 6,000 K
- Minimum value: 1,000 K
- Maximum value: 10,000 K
With TW-Extended, by mixing the three RGB color channels, the warm white range is extended down to 1,000 K and the cool white range is extended up to 10,000 K.
So if you are looking for a LED strip for environments where there is indecision about which LED strip to install (RGB, white temperature control, etc..) or you need a control with automatic white balance or HCL (Human Centric Light), then the combination of RGB+CCT LED strips together with the Enertex dimmer is just what you need.
Among many other features, it can control up to 5 RGB+CCT channels and up to 20 A in total* and with a maximum cable length of 50 m* between the dimmer and the lamp (*see configuration in data sheet).
It also supports scenes, sequences, time and day controlled color temperature control (HCL) as well as KNX Data Secure.
The channel assignment in the ETS can be freely configured from all of the following options:
- 5x independent channels (c.i)
- 1x RGB+CCT
- 1x RGBW + 1x c.i.
- 1x RGB + 2x c.i.
- 1x RGB + 1x Tunable White (TW)
- 2x TW + 1x i.c.
- 1x TW + 3x c.i.
OUTSTANDING FEATURES:
- Five channels, pulse-modulated, max. 20 A total.
- Dimming power up to 480 W
- Variable input and output voltage from 5 to 48 V.
- Also suitable for lamps with high inrush currents (up to 100 A).
- Integrated protection against overvoltage and undervoltage, overcurrent (selective), overtemperature, polarity inversion
- Additional protection functions for power supply and lighting
- Commissioning functions via integrated display and buttons
- Free configuration of the channels
- Accessible in RGB or HSV color space
- Four dimming curves with soft dimming as well as PWM frequencies between 200 and 1200 Hz for optimum dimming results
- RGBCCT - RGBW: extended white balance or extension of tunable white color temperature space by adding R/G/B
- Automatic color temperature mimicking of incandescent lamps (Dim2Warm)
- Time-of-day dimming and day-dependent white control (Human Centric Lighting / HCL)
- Staircase lighting function
- More than 20 predefined sequences and up to 5 freely configurable sequences in RGB or TW operating mode
- Dimming and sequencing, scenes, bit scenes and blocking functions
- Measurement of voltage, current, power, temperature and telegram rate per channel
- Channel-dependent energy and cost meters
- Control of an external KNX switch actuator to switch off the power supply to the LEDs
- Easy installation: no external fuses or distribution terminals required, approved for cable lengths of up to 50 m
- Intelligent generation of pulse patterns to match the load of the power supply (increases the lifetime of the LED power supply)
- Optional encrypted communication with the KNX Data Secure protocol
- Available in two different formats:

05 DE MARZO DE 2020
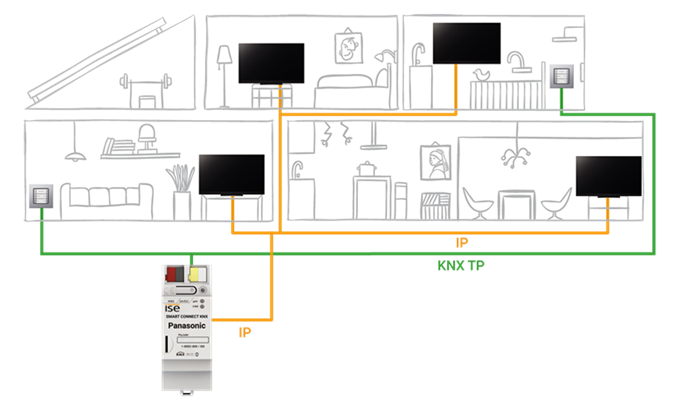
ISE SMART CONNECT KNX PANASONIC

ISE has recently launched the new KNX gateway for PANASONIC televisions (up to 4 devices).
We can now integrate a wide variety of functions that can be very interesting:
- Integrate the Panasonic TV device into different scenes: Wake up, Sleep, Home cinema, etc...
- TV set on stand by when leaving the house
- Save energy by turning off your power outlets after a defined time in standby
- See the image of the outdoor camera on TV screen
- Show customized notifications triggered by a KNX event: Anti-intrusion detectors, KNX weather station events, etc.
- Each gateway allows for the following controls:
- Individual control of up to 4 TV sets:
o ON/OFF
o Volume control
o Program control
o Transfer camera images, e.g. from an external camera
o Source selection
- Status report via KNX: current channel, current source, current volume, mute status, operating status, current errors
- Display predefined text (ETS) or from KNX (14 bytes)
- Bookmark up to ten links
- Complete configuration via ETS
- Extensions via firmware updates
Puedes seguir a Futurasmus en…
Youtube,
Vimeo,
Instagram,
Twitter,
Facebook,
Linkedin,
Google +.
Para más información no dudes en ponerte en contacto con nosotros en el teléfono 965.95.95.11 o en nuestro correo comercial@futurasmus-knxgroup.es.
28 DE OCTUBRE DE 2019
STEINEL TRUE PRESENCE® – THE FIRST REAL PRESENCE DETECTOR

Since 1959 STEINEL has registered more than 300 patents, designs and models for their inventions. These have resulted in over 2500 products belonging to the best of their kind. Some have even revolutionized entire segments.
In 2019, STEINEL has delighted us with the first real presence detector, developed with the True Presence®. technology. It reliably indicates if a person is in the room or not. This means that reliable absence detection is possible for the first time.
The True Presence detector reliably identifies whether persons are present or absent over an area of 64 m² – on the basis of the body's micro movements as well as human vital functions, such as breathing in and out, or shoulder movement.
The detailed knowledge concerning presence and absence results in numerous other applications that can be very valuable for building management. This sets a new standard in advanced building automation!!
Let’s highlight its main features:
- Configurable via ETS.
- Precision high-frequency measurement of the surrounding area and sensibility.
- Room mapping: it creates an image of the room (during the first commissioning)
- Different configurations according to the mounting location: one-person office, classroom, open-plan office, high-bay warehouse, conference room, sports hall, washroom, wc, warehouse
- Functionality: Presence, No-presence, Basic light level function, Light level, HVAC output, Constant-lighting control, Light output 4x, Air pressure, Humidity output, Presence output, Day / night function, Dewpoint, Temperature output, VOC
STEINEL is synonymous of reliable and guaranteed devices, designed in Germany, manufactured in Europe and with a 5-year guarantee.
If you would like to know more about STEINEL products, specially True Presence ®, check out the versions available:
- True Presence®. human presence detector
ref.: 056339 – Código Web: 20011
See product HERE
- True Presence®. human presence detector + + brightness, temperatura, humidity, radial distance, CO2 and VOC.
ref.: 056353 – Código Web: 20012
See product HERE.
Have a look at STEINELS’s whole range HERE.
For more information, visit our web site or contact us via telephone +34.965.95.95.11 or e-mail commercial@futurasmus-knxgroup.com
You can follow Futurasmus in…
Youtube,
Vimeo,
Instagram,
Twitter,
Facebook,
Linkedin,
Google +.
19 DE DICIEMBRE DE 2016
Tips awards 15th anniversary- 1st price - Simulation of an alarm central system with Iddero

In this tutorial I will be explaining step by step how to simulate an alarm monitoring system in any of the IDDERO devices (HC1i-KNX, HC2-KNX, HC2-KNX and Iddero Home Server). This is a very simple example in which only 1 movement sensor is being used. Integrators may use it to understand the basic concept, that can later on be extended, improved and adapted to any specific project.
STEP 1: DEFINITION OF GROUP ADDRESSES
Group addresses created in the ETS: 7/0/0 -> Presence detector 7/0/1 -> Armed/Disarmed 7/0/2 -> Alarm
Internal group addresses created in Iddero-config int/1 -> Arm with delay int/2 -> Filter of "1" in Arm int/3 -> Detector with delay int/4 -> Filter of "1" in Presence detector
STEP 2: DEFINITION OF ZONES AND PAGES
- In Iddero-config, section "Zones and pages", we create a page called "Intrusion" from which we can control and monitor the status of our alarm.
- The page is composed by 4 buttons and it will be assigned an Access Level so that a password is required to open it.
- The first button will be configured as follows: • Name: Arm • Type: Universal Push Button • Data Type: Activation (DPT 1.x) • Visualization format: Icons (red lock both for ON and OFF) • Behaviour: Send only one value • Value when sending: 1 • Link communication object to 7/0/1 (Armed/Disarmed)
- The second button will be configured as follows: • Name: Disarm • Type: Universal Push Button • Data Type: Activation (DPT 1.x) • Visualization format: Icons (green lock both for ON and OFF) • Behaviour: Send only one value • Value when sending: 0 • Link communication object to 7/0/1 (Armed/Disarmed)
- The third button will be configured as follows: • Name: Status Armed / Disarmed • Type: Indicator • Data Type: Activation (DPT 1.x) • Visualization format: Icons (green lock for OFF and red lock for ON) • Link communication object to 7/0/1 (Armed/Disarmed)
- The fourth button will be configured as follows: • Name: Status Armed / Disarmed • Type: Indicator • Data Type: Activation (DPT 1.x) • Visualization format: Predefined texts (ON ->Presence; OFF ->No presence) • Link communication object to 7/0/0 (Armed/Disarmed)
STEP 3: LOGIC GATES
1- AND armed/sensor: The alarm is triggered if the system has not been disarmed before the entrance time elapses. To do so, 3 group addresses are compared: • Name: AND armed/sensor • Logic function: AND • Number of inputs: 3 • Transmit to the input with each event: checked • Filter function: ON and OFF telegrams • Enable blocking: unchecked • Link input object #1 to int/1 (Arm with delay) • Link input object #2 to int/3 (Detector with delay) • Link input object #3 to 7/0/1 (Armed/Disarmed) • Link output object to 7/0/2 (Alarm)
2- Filter Armed "1": When the alarm is armed, telegram "1" is filtered so as to start the timer that will define the "exit time". • Name: Filter Armed "1": • Logic function: ID • Number of inputs: 1 • Transmit to the input with each event: marked • Filter function: only ON telegrams • Enable blocking: unchecked • Link input object to 7/0/1 (Armed/Disarmed) • Link output object to int/2 (Filter of "1" in Armed)
3- Filter Detector with delay "1": When a person is detected by the movement detector when entering the house, the latter sends a "1" via the group address 7/0/0. The telegram "1" is filtered in order to start the timer that will define the "entrance time". • Name: Filter Detector with delay "1" • Logic function: ID • Number of inputs: 1 • Transmit to the input with each event: marked • Filter function: only ON telegrams • Enable blocking: unchecked • Link input object to 7/0/0 (Presence detector) • Link output object to int/4 (Filter of "1" in Presence detector)
4.- Filter Disarmed: When disarming the system via the display, the value "0" is sent to the internal group addresses int/1 and int/3 (Arm with delay and Detector with delay), thus leaving the alarm central ready for a new arming process. • Name: Filter Disarmed "0" • Logic function: ID • Number of inputs: 1 • Transmit to the input with each event: marked • Filter function: only OFF telegrams • Enable blocking: unchecked • Link input object to 7/0/1 (Armed/Disarmed) • Link output object to int/1 and int/3 (Armed with delay and Detector with delay)
STEP 4: TIMERS
1- Delay after arming: The exit time of the system is defined here. In our case, we will have 30 seconds to exit the building, during which the system ignores any movement detection by the detector. • Name: Delay after arming • Data type of the channel: Activation (DPT 1.x) • Propagation delay (base): 1 sec • Propagation delay (factor): 30 • Overlapping of events: Ignore pending events • Enable blocking: unchecked • Link input object to int/2 (Filter of "1" in Armed) • Link output object to int/1 (Arm with delay)
2- Detector delay: The entrance time of the system is defined here. In this example, we will have 30 seconds to disarm the system when accessing the building. If we do not proceed to disarm (which means, the intrusion is real), a "1" will be sent to the group address 7/0/2 (Alarm). • Name: Delay after arming • Data type of the channel: Activation (DPT 1.x) • Propagation delay (base): 1 sec • Propagation delay (factor): 30 • Overlapping of events: Ignore pending events • Enable blocking: unchecked • Link input object to int/4 (Filter of "1" in Presence detector) • Link output object to int/3 (Detector with delay)
STEP 5: ADD TECHNICAL ALARM IN "SAFETY"
Iddero devices have a section called "Safety". Here we can add our intrusion alarm. Thanks to this fact, when the alarm is activated, the display will issue an acoustic signal and an icon will show that an alarm has occurred. Also, a historical log will allow us to check the date and time of each alarm. This is how we can add a configured alarm: • Name: Intrusion alarm • Alarm text: Intrusion alarm • Acoustic signal: checked • Polarity of the alarm object: 1 • Manual recognition: checked • External recognition: 0 • Send value with recognition: Send 0 • Explicit deactivation of the alarm: checked • Reactivation after recognition: never • Link alarm object to 7/0/2 (Alarm) • Link Recognition Notification object to 7/0/1 (Armed/Disarmed) • Link External Recognition object to 7/0/1 (Armed/Disarmed)
STEP 6: E-MAIL NOTIFICATION
The Iddero Touch Displays also have a section called "E-Mail". Here we can define the sending of notifications via e-mail associated to the events occurred in the system. In our example, we will add a notification associated with our alarm as follows: • Name: Intrusion alarm • Data Type: Activation (DPT 1.x) • Notification condition: When the value of the communication object changes • E-mail subject: Intrusion alarm • E-Mail text: (leave blank)
When the alarm is activated, the user will receive an e-mail with the contennt "Intrusion Alarm ON"; when the alarm is deactivated, "Intrusion Alarm OFF".

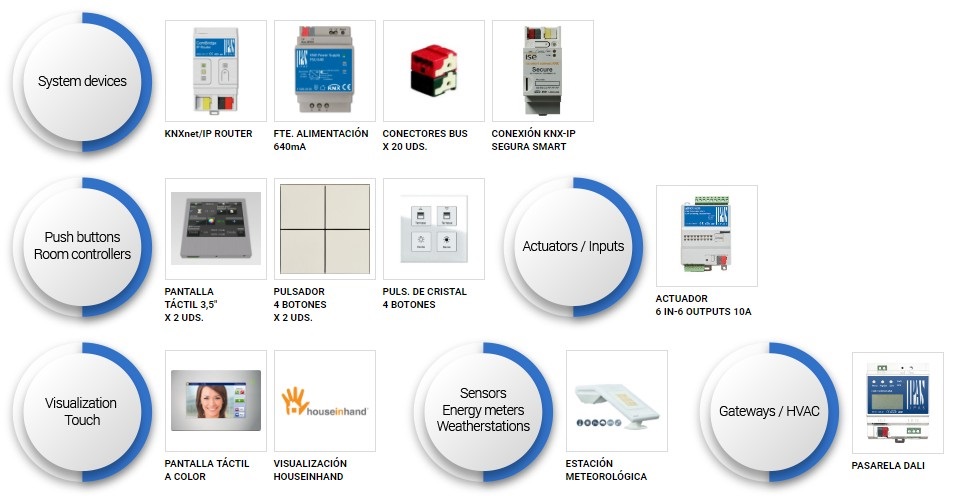
All the following KNX devices are included in the 1st price:
13 DE DICIEMBRE DE 2016
Tips awards 15th anniversary- 2nd price - Save time and avoid problems.

Whenever we finish the configuration of a device and the linking of group addresses, we must program the devices. This can become a tedious task and often we forget programming one device until we realize that the project is not working properly.
Here comes my contribution: once the you are done with the configuration of the devices and the linking of objects, in the same window of group addresses and right-clicking on the appropriate group address, a drop down menu will appear; here we can choose:Download - Full/Parcial download / Download application.
With this the configuration will be automatically sent to those devices contained in that group address, thus avoiding oversights or programming a device unnecessarily.
All the following KNX devices are included in the 2nd price